Category: Front-end Development

  • From Zero to Stable: Frontend Platform’s Load Testing Journey with k6

    From Zero to Stable: Frontend Platform’s Load Testing Journey with k6

    How we went from inconsistent results and infrastructure chaos to a reliable, automated performance regression pipeline for Remix apps.

    Why We Built This

    Frontend Platform owns the template layer that all Remix apps at CarGurus build on.

    When the template ships changes — dependency upgrades, platform improvements, new defaults — those changes ripple across every consumer. A 100ms regression in LCP doesn’t show up in unit tests or linting. It only shows up in production, after it’s already slowed down real users.

    We needed a way to catch performance regressions before they shipped — not just backend latency, but real Core Web Vitals: LCP, INP, CLS, TTFB. And we needed it to run automatically on every relevant change, integrated into CI/CD, with clear pass/fail signals.

    That’s what the k6 load testing pipeline was built to do.

    Choosing the Tool: k6 vs Locust

    Before building anything, we evaluated two options: the in-house Locust self-service load testing tool already offered to all engineering teams, and k6 from Grafana.

    The Locust tool’s strength is organizational familiarity — it’s already in use for backend services. But for our use case, it had a fundamental gap: it couldn’t measure Core Web Vitals. It could tell us server response times, but it couldn’t tell us whether a user’s browser actually rendered the LCP element in time.

    In addition, the self-service load testing tool periodically auto-deletes load test deployments, which conflicts with our need for stable, repeatable configurations and persisted results for longitudinal template/platform benchmarking.

    k6’s browser module changes the equation.

    A single k6 script can run both a backend load test (constant RPS via ramping-arrival-rate, measuring HTTP response times) and a CWV collection phase (headless Chromium, measuring real browser metrics).

    What made this compelling:

    • One script, both dimensions — backend latency and real browser metrics collected in the same test run.
    • Unified reporting — both sets of results feed into the same baseline comparison and produce a single pass/fail signal.
    • TypeScript all the way down — test scripts are written in the same language as the apps being tested.
    • Self-contained regression detection — k6’s handleSummary API lets us intercept all results and run baseline comparison, majority voting, and report generation entirely within the k6 process, without external tooling.

    The Initial Setup

    With the tool selected, we built out a first version of the pipeline. The load-testing-suite repo runs as a service pod on our Kubernetes cluster.

    When a new release tag becomes available in the Remix template, it:

    1. Deploys the target app to an isolated environment (using a truncated CI run identifier as a unique selector, preventing parallel test collisions).
    2. Warms up the app with one single HTTP GET request before k6 starts.
    3. Runs two k6 scenarios concurrently:
      • backend_load — constant RPS for backend metrics.
      • cwv_collection — headless Chromium for browser metrics.
    4. Compares results against the 3 most recent saved baselines using majority voting — if 2 of 3 show a critical regression, the test fails. (Baselines are JSON files committed to the load-testing-suite repo’s baselines/ directory, one per build, written by k6’s handleSummary and persisted via Git.)
    5. Cleans up the deployment.

    The orchestration between the Remix template repo and the load-testing-suite repo uses GitHub’s workflow_call mechanism — the template repo’s test-orchestrator.yml calls load-testing-suite’s run-test.yml as a reusable workflow.

    Flowchart illustrating the deployment process for a Remix app template, detailing feature pull requests, merging to main, provisioning test environments, and load testing workflows.
    Architecture diagram: load-testing-suite components and orchestration.

    The Instability Problem

    Once the pipeline was running end-to-end, we hit a serious problem: the results weren’t reliable. The same commit, tested twice, could produce wildly different numbers.

    Here’s what we saw across two runs against the same commit:

    MetricRun 1Run 2
    Response time P95199ms52ms
    Response time P99598ms132ms
    LCP P75431ms295ms
    TTFB P7552ms36ms

    A 4x difference in P95 means the baseline comparison is noise, not signal. Any regression detection built on these numbers would generate constant false positives.

    Digging into the test output logs, two patterns emerged.

    In the bad runs, TTFB would spike to 200–470ms during the first 30 seconds of the test — the ramp-up phase — and then stay elevated for the rest of the run.

    There were also mid-test throughput dips (iteration rate dropping from 20/s to 6/s) that corresponded with outlier P99 values above 900ms.

    The root causes fell into two categories: the test design was amplifying noise, and the infrastructure was generating it.

    Test Design Fixes

    Warming up the app after deployment

    A freshly deployed Node.js process doesn’t serve requests at full speed because V8 uses tiered compilationthe compilation tier “levels up” based on how many times a function executes.

    Diagram illustrating the V8 Tiering Lifecycle, showing stages: Ignition, Sparkplug, Maglev, and Turbofan along with their corresponding compilation tier up mechanism and execution frequency.
    Diagram: JIT compilation tiers and warm-up behaviour.

    For a Remix app, every layer of a request — route handlers, data loaders, serialization — begins in the slower interpreter tier, while the baseline tier kicks in after ~8 invocations.

    In our early runs, the first request to a fresh deployment took 95–101ms; steady-state responses settled around 25–35ms. That gap is V8 working through its compilation tiers.

    We added a 3-phase warmup between deployment verification and the k6 test:

    1. Readiness: 3 sequential smoke requests to confirm readiness.
    2. Hot path warmup: 3 batches of 10 concurrent requests to push hot functions through enough invocations for TurboFan and warm downstream connection pools.
    3. Steady-state verification: 3 final requests to verify steady state.

    The 36 total requests over ~10–15 seconds aren’t a magic number — they’re enough for V8 to promote the critical request path into optimized tiers before the k6 ramp-up begins.

    Moving from ramping-vus to ramping-arrival-rate

    The original test used k6’s ramping-vus executor.

    With ramping-vus, each VU (virtual user — k6’s unit of concurrency, essentially a single simulated client) loops as fast as it can — request, sleep, repeat. If the app slows down, each VU completes fewer iterations per second, so actual RPS drops. The load is coupled to app performance.

    For regression testing, this is the wrong model. The variable we’re testing is the code change — so everything else needs to stay constant, including the load.

    With ramping-vus, if a code change makes responses 2x slower, the executor responds by delivering 2x less traffic, which can mask the regression. We want to send the same load regardless of how the app is doing, so any difference in P95 is a real signal.

    We switched to ramping-arrival-rate, which fires requests at a fixed rate and allocates however many VUs are needed to maintain it.

    Extending test duration

    The last design fix was the most straightforward: extending the steady-state phase from 2 minutes to 3 minutes, with a 1-minute ramp-up.

    At 30 concurrent VUs, we observed periodic 5–10 second slowdowns occurring roughly every 2 minutes — consistent with V8’s major garbage collection pauses under sustained load.

    With a 2-minute steady-state phase, a GC cycle might land entirely within the measurement window in one run and straddle the boundary in another, creating significant variance in P95 between runs of the same commit.

    We extended the steady-state phase from 2 minutes to 3 minutes to guarantee that every run captures exactly one GC cycle within the measurement window. At a ~2-minute GC interval, a 3-minute steady state ensures the pause always lands inside the window rather than sometimes falling during ramp-up or ramp-down.

    Every run pays the same GC cost, so the variance between runs drops.

    Infrastructure Fixes

    The test design changes made a clear difference. Two runs against the same commit after the fixes:

    MetricBefore (ramping-vus, 2min) Run 1Before Run 2After (arrival-rate, 3min) Run 1After Run 2
    Response time P95199ms52ms81ms49ms
    P95 Variance147ms (4x)32ms (1.7x)

    Backend variance dropped from a 4x swing to under 2x. But LCP P75 still varied significantly between runs — 368–455ms on some runs, ~260ms on others — with no code changes in between.

    The remaining issue was infrastructure-level: the k6 pod was landing on different EC2 instance types each time, and those instance types had meaningfully different CPU characteristics.

    We measured the same test across four different instance placements:

    Instancenr_throttledthrottled_usecThrottle rateLCP P75
    r5a.24xlarge (gen 5)29437.8s7.9%455ms
    m5a.16xlarge (gen 5)1499.2s4.2%368ms
    c6a.2xlarge (gen 6)1508.4s4.6%~260ms
    m6a.32xlarge (gen 6)956.5s2.2%~260ms
    Diagram explaining instance types with labels: 'Instance Family,' 'Instance Generation,' and 'Instance Size' pointing to the components 'm6a.32xlarge.'
    A breakdown of what each of the characters in the instance type name stands for.

    The gen 5 instances (r5a, m5a) use AMD EPYC 7571 CPUs running at 2.5 GHz.

    The gen 6 instances (c6a, r6a, m6a) use the newer EPYC 7R13 at 3.6 GHz boost.

    That’s a ~40% clock speed difference.

    Why instance type matters for LCP:

    The gen 5 and gen 6 rows above have a ~40% CPU clock speed difference (2.5 GHz vs 3.6 GHz).Chromium’s rendering pipeline — parsing HTML, computing layout, executing JavaScript, painting — is largely single-threaded.A faster clock runs the same rendering work proportionally faster, which directly reduces the LCP measurement.

    The 455ms vs ~260ms gap in the table above has nothing to do with the app’s performance; it’s an artifact of where the k6 pod landed.

    CPU limits and CFS throttling

    Linux’s Completely Fair Scheduler (CFS) enforces CPU limits in 100ms windows. If a container exceeds its limit during any window, the kernel pauses all its threads until the next window — even if the node has idle cores.

    Diagram illustrating CPU limitations in container management, showing quota used over a total period and periods of throttling when CPU limits are exceeded.
    Kubernetes diagram: how CFS quota enforces CPU limits on pod containers.

    The pod was originally configured with a 3-core CPU request and 3-core CPU limit, making it a Guaranteed QoS class.

    The problem: Chromium is briefly bursty during page rendering. It might need 4–5 cores for 200ms during layout and paint, even though its average usage over a 100ms CFS period is within limits. The kernel doesn’t care about averages — it pauses the container the moment it exceeds the limit for that period.

    The fix would be to remove the CPU limit while keeping the 3-core request. The pod could then burst above 3 cores when Chromium needs it, eliminating kernel-level throttling during rendering.

    QoS would change from Guaranteed to Burstable, meaning the pod could theoretically be evicted under node memory pressure before Guaranteed pods — acceptable for a short-lived test pod.

    Moving to gen 6 instances

    Removing the CPU limit addressed throttling, but the clock speed variance between gen 5 and gen 6 instances remained.

    We couldn’t pin the k6 pod to a specific instance type — our internal tooling doesn’t expose nodeSelector or affinity fields, and the controller reverts any direct kubectl patch to the Deployment within seconds.

    We consulted the infrastructure team about this constraint and agreed that pinning the k6 pod to a specific instance type was the wrong fix, since it wouldn’t reflect how production pods are actually scheduled. Instead, they raised the minimum instance generation to 6 across our dev clusters, allowing gen 5 nodes to phase out naturally.

    The key insight:

    All gen 6 instance families — c6a, r6a, m6a — use the same AMD EPYC 7R13 CPU at the same clock speed.Once gen 5 instances are gone, a k6 pod landing on any gen 6 node will see the same hardware characteristics for CPU-bound work.The variance from CPU clock speed differences goes away.

    The Stabilized Workflow

    With all changes in place, here’s what the pipeline looks like:

    Test configuration:

    • Executor: ramping-arrival-rate
    • Stages: 1-minute ramp-up → 3-minute steady state.
    • Max VUs: 5 (sufficient headroom at 5 RPS with ~50ms response time).

    Infrastructure:

    • k6 pod: 3-core CPU request, no CPU limit (Burstable QoS).
    • Cluster: gen 6 minimum instance generation (EPYC 7R13, uniform clock speed across all placements).
    • Node.js cluster: 3 explicit workers (CLUSTER_CPUS=3), not auto-detected from host.

    Orchestration:

    • GitHub Actions workflow_call from the template repo to load-testing-suite.
    • Isolated environments via unique CI run identifier as selector.
    • Baseline comparison using majority voting across the 3 most recent saved baselines.
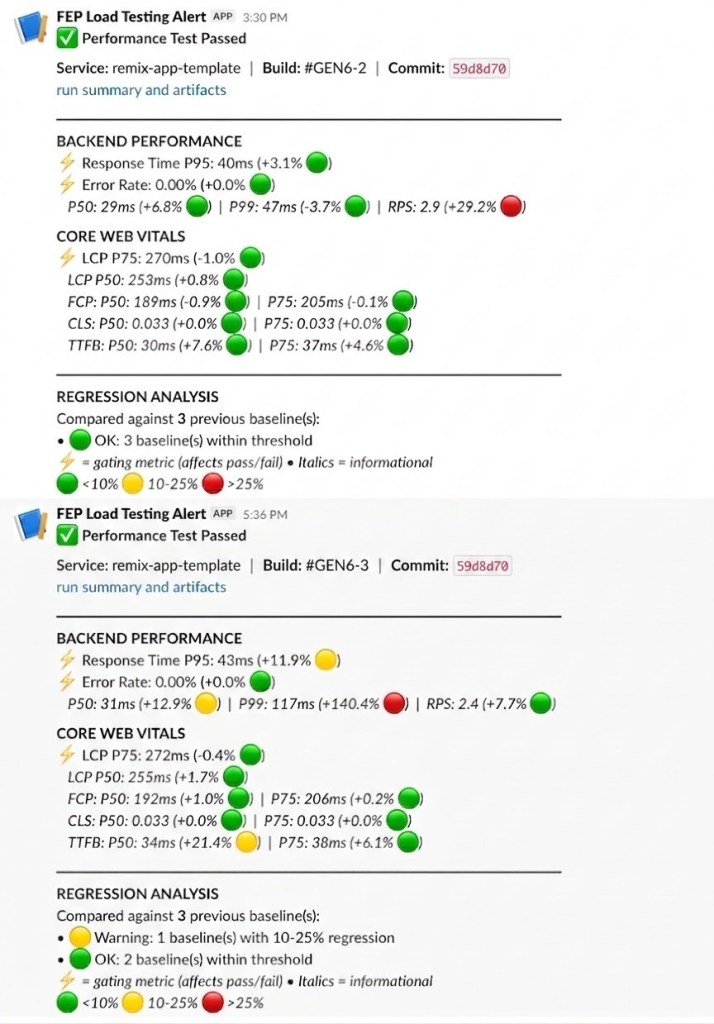
    • Slack notification with P95, error rate, RPS, and all Core Web Vitals.

    Result stability achieved: Runs against the same commit now show P95 differences in the range of ~10ms rather than 100–200ms swings. The LCP variance that was making regression detection impossible has collapsed. The pipeline can now reliably distinguish a real regression from infrastructure noise.

    Performance test report with results from two separate tests, showing backend performance metrics, core web vitals, and regression analysis. Key metrics include response times, error rates, LCP, FCP, and more, indicated with colored indicators for performance status.
    Two consecutive load test runs against the same commit on gen 6 instances show: Response Time P95 differs by just 3ms (40ms vs 43ms) and LCP P75 differs by 2ms (270ms vs 272ms).

    What We Learned

    A few things stood out from this process:

    The biggest source of variance wasn’t the test design — it was hardware. No amount of statistical filtering or outlier trimming would have fixed a 40% CPU clock speed difference.

    Collecting enough data helps, but understanding what’s causing the variance is what lets you fix it.

    Switching from ramping-vus to ramping-arrival-rate was the right call for regression testing. Load that couples to app performance can mask regressions; load that’s independent of app performance surfaces them clearly.

    The constraint from EP — avoid instance pinning so results reflect real production scheduling — was initially frustrating but ultimately correct. The right fix was making the cluster more homogeneous, not making the test more artificial.

    k6’s handleSummary API is genuinely powerful. The entire regression detection pipeline — baseline loading, majority voting, report generation, Slack notification content — runs inside handleSummary as TypeScript, without any external services. That simplicity has made the system easy to extend and debug.

  • Hexagonal Architecture with Remix 2 (now React Router Framework)

    If you are a software engineer perhaps one of the situations below sounds familiar.

    You’ve just finished a small change to a landing page, tweaked some layout, added a new field to your article section. You run the tests… and suddenly something deep in your CMS integration is failing.

    Or maybe you want to reuse a bit of business logic in another Remix route, but the function you need is buried inside a loader with HTTP-specific code you can’t untangle.

    Worse, a business partner excitedly tells you they’ve finally signed the contract for that great new CMS vendor everyone’s been raving about. They want to know if it can launch sometime next quarter. Your stomach drops because you know that means touching dozens of files scattered across your app.

    These are all symptoms of the same problem: your core business logic is tangled up with the messy details of HTTP, databases, and third-party APIs.Hexagonal architecture (also called ports and adapters) gives you a way out. It separates your application’s engine from its bodywork, so you can upgrade one without touching the other.

    Note: This post references Remix, which now continues as React Router Framework. The patterns shown here work with both Remix 2 and React Router Framework.

    Principles of Hexagonal Architecture

    The headaches in the intro all have the same root cause: your application’s thinking is mixed in with its doing. Your business logic, the rules and decisions that make your app valuable, is tangled up with the code that talks to HTTP, databases, and third-party APIs. Change one, and you risk breaking the other.

    Hexagonal architecture solves this by moving your application’s “brain” to the center, surrounded by a clear boundary of ports. Everything outside that boundary, databases, APIs, the browsers, connects through adapters. Think of the ports as clearly marked doorways into your app’s core, and the adapters as the translators who stand outside, speaking the language of the outside world but passing through only what the core actually cares about.

    Let’s see this in action.

    At CarGurus, our Sell My Car landing page needs to show recent, relevant content for users. If the CMS is slow or down, we still want the page to load quickly with fallback articles. That requirement led us to create a service function:

    A note on the code: The examples throughout this post are simplified to highlight architectural patterns and are not direct excerpts from our production codebase.

    Here’s where the ports and adapters idea comes in:

    • fetchSellArticles is a port into the application core. Other parts of the system, like a Remix loader, call it when they need to fetch articles.
    • getArticles is another port, used by the core to talk to the CMS. Behind it sits an adapter that knows all the messy details of the CMS API.
    • captureException is a port to our error tracking service.

    In this setup, the application core only knows about its own domain objects (Article) and rules (use recent articles, fall back if needed). It doesn’t know about where the articles come from, what protocol they uses, or how to authenticate, that’s the adapters’ job. This enables easy reuse of the core logic in different contexts because we avoid direct coupling to the shape of a specific CMS. These properties also simplify unit testing. Let’s look at the tests now.

    In Hexagonal architecture, the application core is a safe place for your business rules, protected from the churn of frameworks, protocols, and vendor APIs. Everything messy is kept outside, where adapters can handle it without contaminating your core. This makes it easy to test business rules in your application core without touching a network or database.

    Adapters: translating between your core and the outside world

    Ports give your application core a clean, stable surface to work with, but ports don’t deal with the messy reality of interfacing with the outside world on their own. That’s where adapters come in.

    Adapters live on the other side of your ports. They are the concrete implementation of the port’s interface. Their only job is to translate between your domain model and whatever shape, protocol, or authentication dance the outside world expects. They take a request from the core, make it understandable to the outside system, and return a result the core can use without knowing how it was produced.

    This adapter takes care of:

    • Building a CMS-specific request payload
    • Handling authentication
    • Unwrapping the CMS’s nested response format into a plain Article[]

    From the perspective of the application core, none of that exists. It just calls getArticles with a simple config expressed in terms the business cares about, things like tag and orderBy, and gets back Article objects. The port’s interface speaks the language of the core’s domain and hides details specific to the CMS.

    Why isolate adapters?

    Even if your CMS supports powerful query expressions, resist the urge to expose them through the port. The port should model business concepts. That keeps the application core decoupled and your tests simple; the adapter can translate domain intent into whatever syntax, payload, or authentication the CMS expects.

    Keeping CMS logic in a single adapter means:

    • If the CMS API changes, you update one file.
    • If you switch vendors, you can rewrite the adapter without touching the core or your tests for fetchSellArticles.
    • An API outage or schema change won’t break your business logic tests, only the adapter’s integration test might need attention.

    In other words, the adapter acts as an anti-corruption layer: it absorbs the quirks, inconsistencies, and churn of external systems so your core stays clean, stable, and focused on the work that matters to the business.

    Testing adapters

    Since adapters are the only code that knows about external systems, they’re also the only place where we need slower integration tests. Here we can integrate directly with the CMS system to ensure our systems are working as expected.

    Without business logic our adapter is fairly simple. It doesn’t contain any conditional logic in its behavior. This means we can get away with just a single test to ensure its working as expected.

    From the perspective of the application core, a CMS adapter is just one kind of translator, but it’s not the only one your Remix app needs. Every time your app talks to the outside world, whether it’s through HTTP, WebSockets, a queue, or a browser API, there’s an adapter doing the translation.

    That includes Remix itself.

    Remix as an Adapter

    In a hexagonal architecture, Remix’s loaders and actions are simply another kind of adapter, no different in principle from your CMS or error-tracking adapters. The only difference is what they translate: instead of converting between your domain and a vendor API, they convert between your domain and HTTP itself.

    Here’s what that looks like in practice:

    In the code above, the loader unwraps the HTTP request, validates the region parameter, and calls the fetchSellArticles port in the core. It then wraps the resulting list of recentArticles back into a JSON HTTP response.

    The important thing: the core has no idea this request came from Remix, and Remix doesn’t know anything about how fetchSellArticles actually gets its data.

    Testing the Remix Adapter

    Testing this adapter is fairly straightforward using the same outside-in approach we used for the application core.

    Just like with the CMS adapter, we mock the port (fetchSellArticles) so we’re testing only this adapter’s behavior. The pattern is the same: test the translation layer in isolation, not the layers on either side. TypeScript guarantees the fetchSellArticles interface stays in sync and alerts us to any changes in the contract that might break our test or production code.

    Since we have a conditional in this adapter we need 2 tests. The first test ensures the code flows correctly in the happy path and the second test ensures the loader adapter returns a 404 for invalid data. The 404 is an HTTP concern, so it lives in the HTTP adapter. Business rules stay in the application core and protocol rules stay at the edge.

    Seeing the pattern

    By now, you’ve seen this boundary in action twice:

    • When the outside world calls in (a Remix loader, a webhook), the adapter unwraps the request, passes a clean domain value into the core through a port, and wraps the core’s response back into the external format.
    • When the core calls out (fetching from a CMS, sending an email), the adapter takes the domain request, translates it for the external system, and converts the response back into the core’s domain model.

    Same rules in both directions. That’s the beauty of hexagonal architecture, the boundaries and responsibilities never change, which makes the system predictable, testable, and much easier to evolve.

    Pro Tip: Don’t let HTTP envelopes leak into your application core

    One of the easiest ways to erode your adapter boundary in Remix is by passing raw Request or FormData objects straight into the application core. It’s tempting, they already hold the data you need, but this couples your business logic to HTTP and blinds your type checker.

    From TypeScript’s perspective, Request and FormData are opaque containers. The compiler can’t tell what’s inside them, so it can’t help you catch missing fields, invalid formats, or typos in parameter names until runtime. Every time the application core reaches into one of these envelopes, you lose the static guarantees you worked so hard to get.

    You may be building a web app, but your application core doesn’t need to be coupled directly to HTTP. That coupling limits reuse in CLI scripts or background jobs, and it forces you to construct HTTP objects just to run business logic unit tests.

    The fix is simple:

    • Unwrap and validate HTTP data in the Remix adapter.
    • Convert it into explicit domain types (Region, ArticleQuery, UserId, etc.).
    • Pass those domain types through your ports into the application core.

    If your application core needs a Region, it should receive a Region, not a Request it has to dig through. This keeps HTTP concerns out of the core, keeps your ports clean, and lets TypeScript fully enforce correctness across the boundary.

    Bringing it all together

    Those brittle tests, tangled business logic, and stomach-dropping vendor changes from the start of this post?
    Hexagonal architecture is how you prevent them from taking over your life as a Remix developer.

    By putting your application core, the rules and decisions your business cares about, in the center, and surrounding it with clearly defined ports, you create a safe, stable space for the logic that matters most. By pushing all framework, protocol, and vendor-specific code into adapters at the edges, you keep those details from leaking inward and complicating your core.

    Whether the call flows into the application core (a Remix loader, a webhook) or out of it (fetching from a CMS, sending an email), the pattern is the same: unwrap external details at the edge, work in your domain language in the center, then wrap results back for the outside world.

    Once you start seeing Remix loaders and actions as just another kind of adapter, you’ll stop worrying about whether a change will ripple unpredictably through your app. You’ll know exactly where to look, what to change, and what to test.

  • Data Loading Patterns in Remix Applications

    Introduction: Understanding the Value of Server-Side Rendering (SSR)

    Server-side rendering (SSR) applications like Next.js and Remix play a pivotal role in delivering substantial value to both CarGurus customers and the company itself. These frameworks offer the ability to present web pages seamlessly on low-performance devices and in scenarios where JavaScript is disabled. Notably, SSR also contributes to improved search engine rankings, as crawlers can efficiently process server-generated pages containing all content—a notable distinction from client-side rendering (CSR). Frameworks such as Remix and Next.js offer several advantages. The initial rendering occurs on the server, providing the browser with a fully-loaded HTML page. Subsequently, as users engage with the content, the browser receives and executes the JavaScript to hydrate the page, enabling client-side rendering. This approach offers developers the flexibility to implement progressive enhancement, thereby providing an effective fallback to SSR if JavaScript is unavailable. While SSR offers substantial benefits, challenges arise when rendering a fully-formed HTML page becomes time-consuming. For instance, a server may need to make intricate requests to third-party services, leading to a delay in response time and a less-than-ideal user experience, characterized by an empty browser tab accompanied by a loading spinner. In this article, we will delve into several techniques employed at CarGurus to address and mitigate the challenges posed by time-consuming requests during server-side rendering. Our focus is on enhancing the overall user experience by optimizing the performance of SSR applications.

    Exploring SSR Frameworks: Next.js and Remix

    We commence our exploration with a fundamental Remix application. Following the creation of the project and the addition of minimal functionality for page navigation, we have our Application, Home, and About pages which all respond promptly. However, a notable delay is observed when loading the Profile page, prompting us to explore strategies for improving its performance. By implementing these optimizations, we aim to ensure that CarGurus continues to deliver a seamless and efficient user experience, even in scenarios where SSR may face challenges in instantaneously rendering fully-formed HTML pages.

    Initial branch and Profile page

    Let’s begin by simulating a lengthy backend request to get user details:

    import { useLoaderData } from "@remix-run/react";
    
    export async function loader() {
        return new Promise((resolve) => {
            setTimeout(() => resolve("Profile"), 3000); // represents long request
        });
    }
    
    export default function Profile() {
        const data = useLoaderData();
        return data;
    }

    While a three-second delay may not seem significant on its own, particularly considering that API calls can often take longer, it can nonetheless have a notable impact on the overall user experience. In the absence of immediate feedback following the user’s selection of the Profile page, there is a potential for frustration or confusion to arise. To illustrate this point, please refer to the screen recording provided below:

    At this point we all understand the problem, let’s talk about possible solutions.

    The initial solution focuses on the moment a user initiates navigation from the Home page to the Profile. At this point we can provide the user some feedback like “We are processing your request, and the page will be available shortly” can reassure the user. Let’s examine the code of the Home page to implement this feature: Leaving home page example and Home page changes

    import { useNavigation } from "@remix-run/react";
    
    export default function Home() {
        const nav = useNavigation();
        const isLoading = nav.state === 'loading';
        const content = isLoading ? 'Loading...' : "Home page";
        return content;
    }

    We utilize the useNavigation hook to manage navigation states. When the application state is loading we return Loading... as page content. In this example, a user can see something happening while they are waiting for their profile to load. The only problem with this approach is that we will have to add this code snippet to every page where we expect a user can go to a Profile page and it won’t help us when we navigate directly to a Profile page:

    Here we can see noticeable delay if we go straight to profile view:

    Another option is to switch to CSR. This involves initially returning a partially rendered page with quickly available data, followed by fetching additional data that may require more time to load. This approach combines the advantages of both rendering methods. Initially, we return the page with data necessary for rendering everything above the fold, keeping the user engaged. Then, we fetch additional data that will appear below the fold, significantly improving our Largest Contentful Paint (LCP). Below is an example illustrating this concept. Please note that while the example isn’t presented below the fold, it provides insight into its functionality and potential usefulness. Let’s examine the code implementation:

    CSR with resource routeProfile page and Profile resource endpoint

    // profile resource
    const getUserDetails = () => new Promise((resolve) => {
        setTimeout(() => resolve("User details"), 3000);
    });
    
    export async function loader() {
        return await getUserDetails();
    }
    // profile page
    import { useFetcher, useLoaderData } from "@remix-run/react";
    import { ReactNode, useEffect } from "react";
    
    export async function loader() {
        return {
            mainPageContent: "Profile",
        };
    }
    
    export default function Profile() {
        const { mainPageContent } = useLoaderData<typeof loader>();
        const fetcher = useFetcher();
    
        useEffect(() => {
            fetcher.load('/api/profile')
        }, []);
    
        return <div>
            <div>
                {mainPageContent}
            </div>
            <div>
                {fetcher.data ? fetcher.data as ReactNode : <div>Loading...</div>}
            </div>
        </div >;
    }

    Here we return the page with a profile header and request all the data for the user profile after the page gets rendered in the browser. useEffect won’t work on the server side, it will be triggered only when React runs in the browser, then it will send the request to the resource route to get actual user data. When the data is available, React will render it on the client side, opening a Profile page from the blank. Navigating from the Home page will work the same:

    A third option closely resembles the second one, but without a separate resource route: Async and defer branch and Profile page

    import { Await, useAsyncValue, useLoaderData } from "@remix-run/react";
    import { defer } from "@remix-run/node";
    import { Suspense } from "react";
    
    const getUserDetails = () => new Promise((resolve) => {
        setTimeout(() => resolve("User details"), 3000);
    });
    
    export async function loader() {
        return defer({
            deferedData: getUserDetails(),
            mainPageContent: "Profile",
        });
    }
    
    const UnderTheFoldContent = () => {
        const resolvedValue = useAsyncValue();
        return <>{resolvedValue}</>;
    };
    
    export default function Profile() {
        const { deferedData, mainPageContent } = useLoaderData<typeof loader>();
    
        return <div>
            <div>
                {mainPageContent}
            </div>
            <div>
                <Suspense fallback={<div>Loading...</div>}>
                    <Await resolve={deferedData}>
                        <UnderTheFoldContent />
                    </Await>
                </Suspense>
            </div>
        </div >;
    }

    Several changes have been implemented. First, our loading function now returns a deferred object instead of a resolved promise. This object includes one property containing already resolved content, which we can render immediately, and a second property representing an unresolved promise.

    Next, we introduce a Suspense section on the page, wrapping the Await component. While our promise remains unresolved, we render a fallback state. Once the promise is resolved, we render the UnderTheFoldContent component, which accesses the resolved value using the useAsyncValue hook.

    The resulting application will function as follows:

    Addressing Slow API Responses: Workarounds and Solutions

    As observed, the initial portion of the page loads immediately. Subsequently, as the remaining content becomes available, we update only the loading section. Both the second and third options will work only when Javascript is enabled in the browser In our last demo there’s a notable issue: when we navigate to the Profile page, load data (which takes 3 seconds), then return to the Home page and attempt to reopen the Profile page, the user is forced to wait an additional 3 seconds to retrieve profile details. This redundancy in loading time is undesirable. However, if our data doesn’t change frequently, we can explore caching solutions. We have various options at our disposal, including HTTP caching, localStorage, sessionStorage, indexedDB, and memory cache. Let’s begin by exploring HTTP caching: Http cache branch and Profile page

    the only change on profile page was to add http headers:

    export async function loader() {
        return defer({
            deferedData: getUserDetails(),
            mainPageContent: "Profile",
        }, {
            headers: {
                "Cache-Control": "public, max-age=3600",
            },
        });
    }

    Enabling HTTP caching instructs the browser to cache the response from this page for an hour. Consequently, the next time the user visits the page, the browser won’t need to make a request to our server at all. Let’s observe a demonstration with both disabled and enabled browser cache to understand the impact:

    Another option is to utilize memory or any other storage mechanism as a cache. Let’s explore an example of this approach: Memory cache and our Profile page

    Here, we utilize the clientLoader and a local variable as our cache:

    let response: null | typeof loader | {} = null;
    export async function clientLoader({serverLoader}: ClientLoaderFunctionArgs) {
        if (!response) {
            response = await serverLoader();
        }
        return response;
    }
    
    clientLoader.hydrate = true;

    If the router file contains a clientLoader function, Remix will invoke it instead of the loader. One of the arguments provided to this function is serverLoader. Here, we check if we already have a response from the server. If so, we don’t need to wait and can simply return the response. Otherwise, we must wait for the backend first.

    Setting clientLoader.hydrate = true; means that the clientLoader will be called on the first page load. If not set, the clientLoader will be invoked only on the second page load.

    As a result of this change we have the following demo: even with the browser cache disabled, we can retrieve our Profile page pretty quickly.

    Enhancing User Experience with Prefetching and Client-Side Rendering (CSR)

    In our last example, we discussed utilizing local storage, session storage, or IndexedDB as alternatives to the local variable for caching purposes. To simplify this process, we can leverage the capabilities of the localForage library, which provides a unified interface to work with all these storage APIs: localforage

    There are instances where we can anticipate a user’s actions. If we know that our user will likely visit the Profile page, we can use a React Router feature to prefetch and cache content in advance. React Router provides us following strategies for prefetching:

     * - "intent": Fetched when the user focuses or hovers the link
     * - "render": Fetched when the link is rendered
     * - "viewport": Fetched when the link is in the viewport

    For our demo app, there is no difference between viewport and render, but we reasonably anticipate that a user will navigate there. Therefore, for simplicity we’ll use render, and see how it works: Prefetch branch changes in our NavBar component:

    <NavLink to="/profile" className={linkStyle} prefetch="render">
      Profile
    </NavLink>

    We just added prefetch attribute, let’s see the demo:

    Conclusion: Harnessing the Flexibility of Remix for Better SSR Performance

    As evident from the demonstration, upon page refresh, the browser promptly sends a profile request. Although it still takes some time to retrieve the data, the user is occupied with other activities in the meantime. Consequently, by the time the user navigates to the Profile page, all the necessary data is readily available in the prefetch cache.

    In summary, we explored various strategies to optimize server-side rendering (SSR) applications, focusing on enhancing the user experience. We discussed the benefits of SSR frameworks like Next.js and Remix, which enable rendering both on the server and client-side, improving page load times and search engine rankings. We investigated techniques such as prefetching and caching, utilizing options like HTTP caching, local storage, and libraries like localForage. Additionally, we explored React Router’s prefetching strategies to anticipate user actions and improve performance.

    It’s important to note that there’s no one-size-fits-all solution to address slow API responses. However, with Remix’s flexibility, we have a range of options available to work around such challenges and optimize the user experience. Here’s to creating faster, more efficient, and user-friendly web experiences. Happy coding!